 English
Admin panel accounts
Creating an account
Here you can create Admin Panel user accounts and grant access permissions.
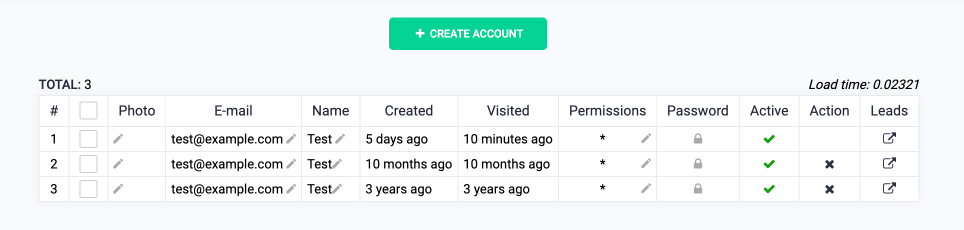
To create a new user account, click on the “Create account” button and fill in the pop-up form:
- Email
This is the email address of the user you create an account for. It can be used as a username when logging in. - Name
This is the name of the user you create an account for. It is only displayed in the Admin Panel. - Password
This is the password that will be used when logging in. It can be arbitrary and must be at least 6 characters long. - Choose Permission
Here you can choose the pages that the new user can access. To select them, tick the corresponding boxes in the drop-down list and click the “Apply” button to confirm changes.
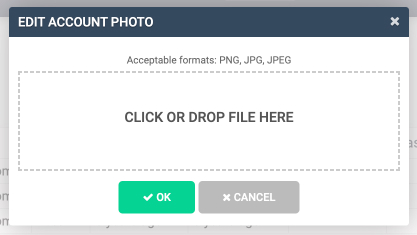
User photo
After the account is created, you can add a user photo.
Supported formats: PNG, JPG, JPEG.
To add a photo, hit the pencil icon in the Logo line. Drag and drop the file into the modal window or click it to choose the file manually.
Managing accounts
Editing account details
- Editing account details
- To change a name, email, or permissions, click on the pencil icon in the corresponding field.
- To change a password, click on the padlock icon in the corresponding field. Enter a new password that can be arbitrary but must be at least 6 characters long.
Hit the “OK” button to confirm and save changes.
Please note: The user will have to relog in if their account email or password has been changed.
Account status
To change a current account status, click on the icon in the “Active” column:
- A green checkmark means the given account is active yet can be deactivated in the pop-up window once the mark is clicked.
- A red cross means the given account is not active yet can be activated in the pop-up window once the cross is clicked.
Deleting an account
To delete the Admin Panel user account, click on the blue cross icon in the “Action” column.
- In the "Confirmation" modal window, click the "OK" button to delete the account.
- If you clicked the cross icon by mistake, click the "Cancel" button in the "Confirmation" modal window.